Cilantro Pesto Pasta, S’mores Brownies and a new home

The last few weeks have been a rollercoaster, but we finally settled into our new (to us) place last week. There have been some nice surprises (beautiful sunsets, tons of girls in the neighborhood who are so wonderful at including our girls) and also some challenges (cooking on a camping stove until we get a proper one and fixing a little bit of almost everything). Overall, the transition has been a smooth one and we are settling in nicely.

The last day of cooking on the camping stove, I was feeling tired and uninspired. I opened up the fridge and found a bunch of cilantro and from there came this meal. It turned out to be pretty delicious and we will be making it again.

Cilantro Pesto Pasta with Roasted Zucchini
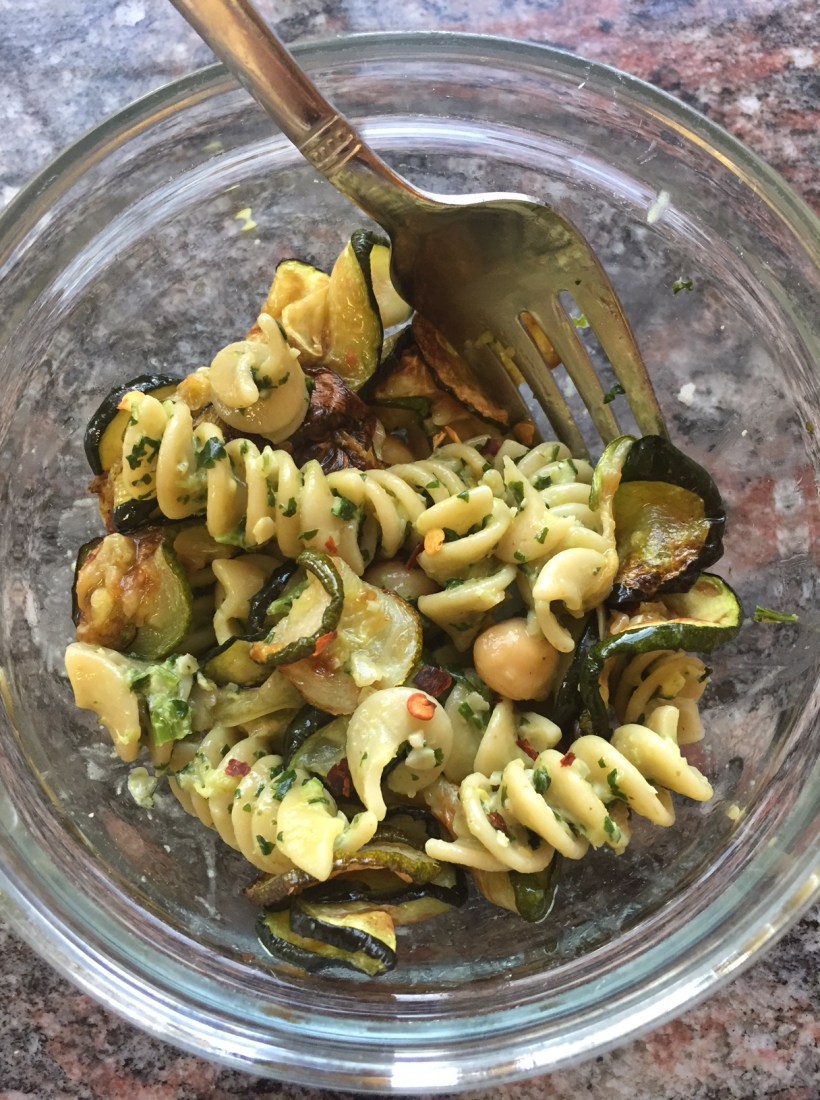
IMG_2075

Ingredients:

1 pound of rotini pasta (I usually use Barilla Plus – healthier than the average pasta and tastes great)

1 bunch of cilantro

Big handful of pumpkin seeds (toasted in a toaster oven or on the stove)

1 clove (or more to taste) or garlic

1 lemon

Olive oil

1/2 – 1 cup parmesan grated

Salt and pepper to taste

1 can chickpeas, drained

4-5 zucchini or any summer squash

Instructions:

  1. Prepare the pasta according to the directions.
  2. Slice the zucchini lengthwise or in coins to 1/4 inch thick. Coat a baking sheet liberally with olive oil and lay out the zucchini in a single layer. Bake at 375 degrees for about 10-15 min until cooked through, flip them over and cook until brown and crisp at the edges. Repeat until all of the zucchini are cooked.
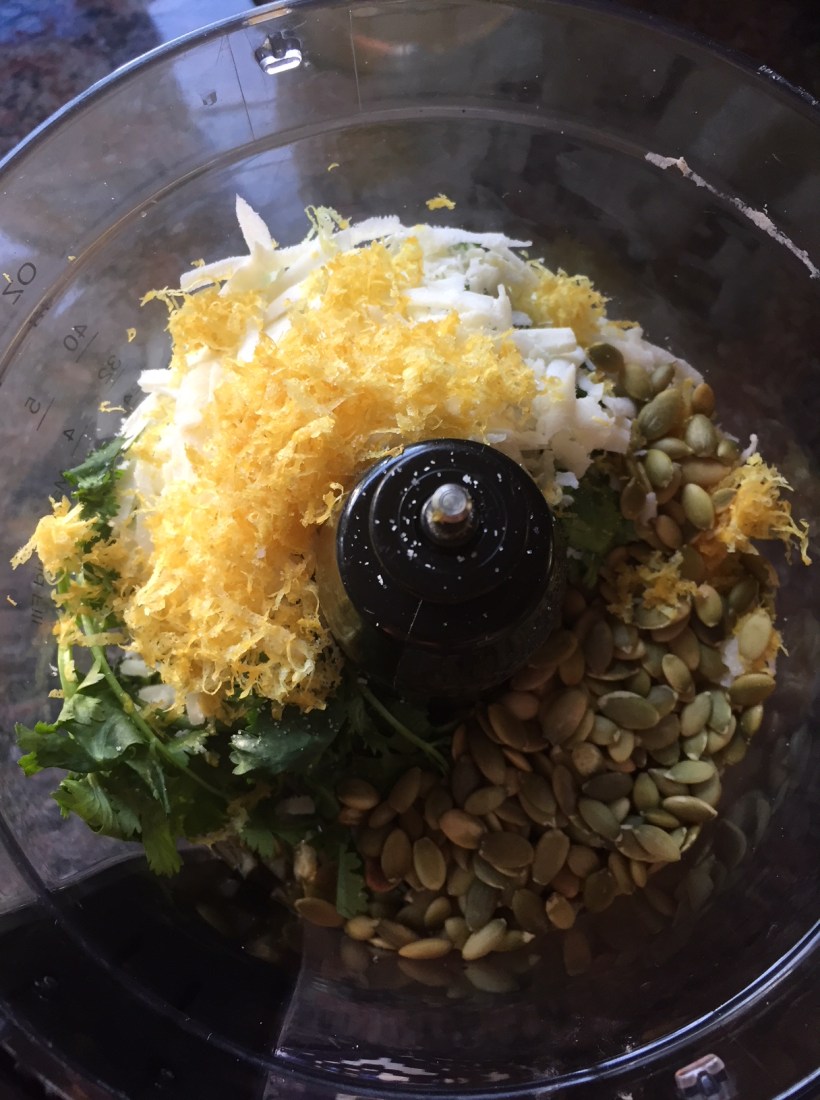
  3. In a large food processor, combine cilantro, garlic, 2-3 glugs of olive oil, parmesan cheese, pumpkin seeds, salt, pepper, and lemon zest. Process and add some of the pasta water to thin it out as needed.

IMG_2074


3. Once the pasta is ready, combine with the pesto and drained chickpeas. Mix in some of the roasted zucchini. Sprinkle with crushed red pepper if you like a little kick. Enjoy!

S’mores Brownies

img_2050.jpg


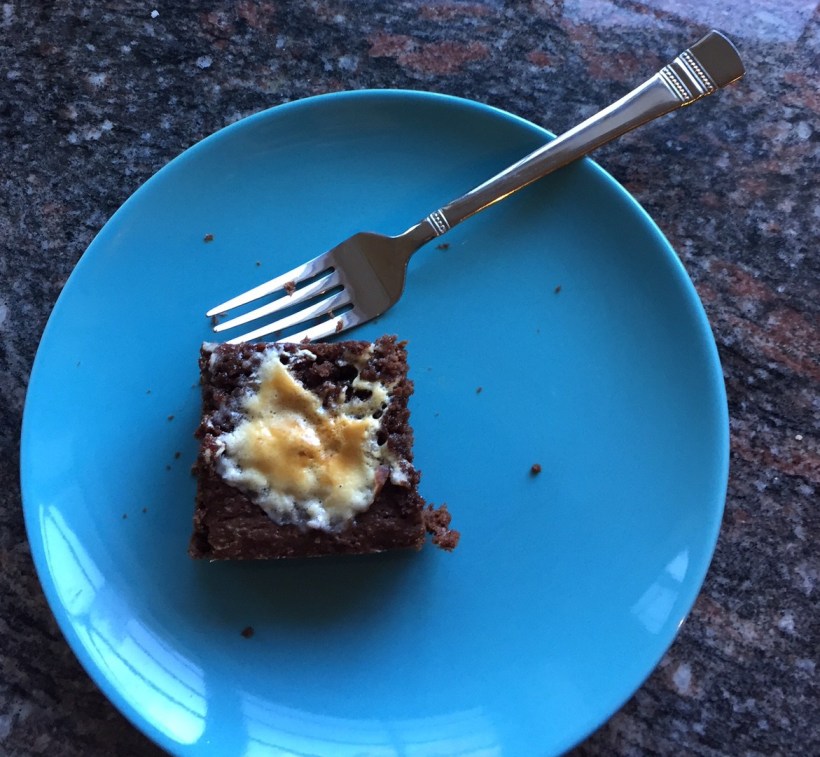
When we moved in, I wanted to bake something to “break in” the new house. We chose these s’mores brownies from Joy the Baker, they were easy and didn’t require too many different types of prep. We ended up omitting the graham crackers because we didn’t have any and they still turned out amazing. We also didn’t have unsweetened chocolate so we used semisweet and decreased the sugar by half – they were a little less sweet than regular brownies but the marshmallows balanced it out and made them perfect.

Here is the link to the recipe: http://joythebaker.com/2009/04/smores-brownies/

Have a happy Wednesday everyone and to those who celebrate, Happy Diwali!

Love,

Pooja

Weekend Breakfast: Chilaquiles

Hello everyone!

Once in a while on the weekend, we feel like having a fancier breakfast. My kids don’t generally like eggs so I always end up making pancakes for them and eggs for us. This recipe is great because it’s not very egg-y tasting, so that even Diya (who has never ever eaten an omelette) will eat this.

It comes together relatively quickly for something that looks like much more work. This is my version of it that I came up with while experimenting one morning. We use the Casa Sanchez thick chips to give a bit more bite. You can use any toppings that you like, but our favorites are cilantro, avocado, and a sprinkling of cheese.

Chilaquiles

(this serves 2 people as a main or 4-5 people as a side)

IMG_1995

Ingredients:

one pint cherry tomatoes

1/2 bag (or more) of tortilla chips

salt/pepper to taste

olive oil

taco seasoning (or cumin and paprika)

4 eggs

toppings: queso fresco (I used feta), cilantro chopped, sour cream, avocado (chopped or sliced), anything else that sounds good!

IMG_1994

Methods:

  1. Heat 3 tablespoons of olive oil in a cast iron skillet until shimmering. Add the cherry tomatoes (sliced in half lengthwise)
  2. Cook, stirring occasionally, until softened. Add taco seasoning and salt/pepper to taste.
  3. Beat the eggs with 1/4-1/2 tsp salt. I used one egg and three egg whites (I am not a huge fan of the taste of the yolk).
  4. Place a large handful or two of the tortilla chips into the tomato mixture, digging them into the mixture a bit.
  5. Pour the eggs over the chip/tomato mixture and cook for a minute, then turn the chips over in sections and continue to cook. Continue this process until the eggs are set and coating most of the chips.
  6. Take off the stove and add desired toppings. Serve immediately. Enjoy!


IMG_1988IMG_1989IMG_1990IMG_1992IMG_1991IMG_1993


Love,

Pooja


Quick Biscuits

Good morning everyone!

I made a caprese salad yesterday (love those summer tomatoes!) and Diya said, “I wish we had some bread to go with this!” So, of course, I told her that she should make some. She decided that she wanted to make something quick and easy, and settled on making biscuits.

These were easy, quick and super-delicious! They were especially good straight out of the oven with some melted butter. Yum! Diya adapted a recipe from Smitten Kitchen that originally included blue cheese and scallions (which she omitted because she decided she wanted plain and simple biscuits).

Quick Biscuits

Ingredients: 

2 1/4 cups all-purpose flour
2 1/2 teaspoons baking powder
2 teaspoons sugar
3/4 teaspoon baking soda
1 teaspoon salt
6 tablespoons (3/4 stick or 3 ounces) cold unsalted butter, cut into 1/2-inch cubes
1 cup well-shaken buttermilk

Some tips/tricks:

Buttermilk: make your own with 1 tablespoon white vinegar and 1 cup milk, let sit until curdled – about 10 min

Butter: I like to do this best by freezing the butter and then grating it into the dry ingredients – helps keep the flakiness and makes it easier to incorporate. When the butter is distributed throughout all of the flour – that gives the best flakiness

Do not overmix this dough – otherwise your biscuits will be tough and not light and fluffy

Methods: 

  1. Pre-heat the oven to 450 degrees
  2. Mix the dry ingredients (flour, baking powder, sugar, baking soda, salt)
  3. Add in the butter and use your hands or a pastry blender to incorporate well into the flour until it looks like sand that clumps together when squeezed.
  4. Add in the buttermilk and mix with a spoon until just combined.
  5. Place on a buttered baking sheet, leaving two inches between the biscuits. Ours were too big initially so had to be broken in half to cook through.
  6. Bake until golden – 16 to 20 minutes.
  7. Eat warm with butter!

IMG_1898-1


Vegetable Satay Noodles

Good evening! Hope that you all are having a wonderful start to your summer! We had a jam-packed day today that ended with the girls passing their Karate tests and becoming yellow belts while the baby cheered them on. It felt like a good and big first step in their martial arts journey.

I just turned 40 which feels surreal – I think mostly because it feels like my 20s didn’t really happen since I was in school and residency for most of them. Still as everyone tells me – 40 is the new 30! I am trying to figure out how to celebrate for myself and I think that the answer is going to be a haircut – something different maybe – but we will see. There has already been a lot of change in my life over the last year and I am not sure that I am ready for another big one – even if it is as simple as a haircut!

These satay noodles were a recent weeknight dinner – I had a lot of veggies and was trying to think of something to make that would be colorful and still fresh tasting. This really hit the spot – my kids said it was a do-over…

Ingredients: 

For the sauce:

1/2 tsp honey

2 tablespoons tahini

2 tablespoons peanut butter (smooth)

Splash of rice wine vinegar

1 tablespoon coconut oil or olive oil

1/4 tsp ginger powder

1 can coconut milk

salt/pepper to taste

The noodles:

3-4 cups assorted vegetables (I used broccoli, red pepper and carrots)

16 ounces noodles (can use soba, buckwheat, etc. I used edamame noodles)

olive oil

garlic (1 clove, chopped)

chopped cilantro, chopped peanuts, toasted coconut, toasted pumpkin seeds (optional)

Instructions: 

  1. First prepare the noodles. When cooked, rinse with cool water and set aside. Reserve some of the cooking water in case needed to thin the sauce.
  2. In a deep frying pan, cook the garlic on low heat in 1 tablespoon of the oil, taking care not to burn the garlic.
  3. Add the hardest vegetable first (carrot for me) and 1 tsp water. Cover and cook for 3-5 minutes until bright. Continue with the other vegetables, until all are cooked through. I did not cover and cook when I added the pepper and the broccoli. I just added the pepper first, cooked for 2 minutes, then added the broccoli and cooked for an additional 3-5 minutes.
  4. In a medium bowl, whisk together the sauce ingredients, saving the coconut milk for last. The mixture should be smooth. If it is too thick, add some of the past water, a couple of tablespoons at a time, until it is thin enough to toss with the noddles.
  5. In a large bowl, mix together the noodles, sauce and vegetables. Top with the optional toppings – I used cilantro and toasted pumpkin seeds for ours.
  6. Enjoy!


Love,

Pooja


Pan-Fried Brussels Sprouts

Dear Readers,


We have all been battling colds for the last few days – I am hoping that it is the last one of the season. Things have otherwise been busy as well – we are planning a short trip to NYC next week, just the older girls and me. We are really excited to explore together! They are such fun ages for a trip like this and we have been plotting our itinerary for a couple of weeks. Fingers crossed that the weather stays nice.

I will be co-hosting a conference with my friend Dr. Nwando Olayiwola. She is incredible – a true inspiration. She has written a book about how to succeed as a Minority Woman Professional (MWP) and it is spot on – tips that come straight from her experiences and are explained with heart. She has a list of ten ingredients that are essential. One of the ingredients is “Bring Others Up”. I loved reading this part of the book because this is something that I see Nwando live in her everyday life: she is always looking for an opportunity to elevate others.

The conference is one in a series that has been created to help MWPs “survive and thrive”.

If you are interested in learning more, you can find the book here: https://www.amazon.com/Minority-Women-Professionals-MWPs-MVPs/dp/0692720448/ref=sr_1_2?ie=UTF8&qid=1490328277&sr=8-2&keywords=olayiwola

For more information about the conference: https://inspire-health-solutions-llc.myshopify.com/pages/conference-information

Today for dinner, I made a simple pasta with spring vegetables. The brussels sprouts were a side – to get more veggies in. Brussels sprouts can be a bit bitter and I find that this method of cooking really brings out the flavor and gets rid of the bitterness because it allows for them to cook through. The red bell pepper provides a nice contrast in terms of color and flavor.

IMG_1236

Ingredients: 

1 pound brussels sprouts (or 20-30)

1/2 red bell pepper (optional)

2 tablespoons olive oil

1 teaspoon water

1 tablespoon butter

salt and pepper to taste

Instructions: 

  1. Slice the brussels sprouts very thin (I get about 6-8 slices per sprout) – alternatively you can use a mandolin but I get nervous about slicing my finger off. Dice the bell pepper.
  2. Heat the olive oil until shimmering in a cast iron or nonstick skillet. Add the brussels sprouts and stir well to coat. Season with salt.
  3. Add the teaspoon of water and cook, covered, for about 1 min. When you remove the cover, the sprouts should be bright green in color.
  4. Sprinkle a generous amount of black pepper and stir. Add in the bell pepper if using. Cook uncovered, stirring frequently, until the sprouts start to brown and get a little crispy around the edges (2-4 minutes).
  5. Add in the butter, stir until coating the sprouts. Cook for another minute to incorporate the flavors. Sprinkle additional salt as needed.
  6. Enjoy!


Vegetarian Chili

Dear Readers, this weekend was a big one for me – my oldest daughter turned 11. We are so blessed to have this amazing daughter – she is an incredible big sister and is so self-assured in a way that I definitely was not when I was her age (and still sometimes am not!). She is smart and witty and kind and I thank my lucky stars every day to have her to love. My kids’ birthdays are always a reminder to me about the slow but steady march of time. I love this selfie that she took on her birthday, just as she headed out to school.

IMG_1174


Also, this weekend, my first orchid of the season bloomed! I love when this happens – it really signals the beginning of spring for me and is such a surprise, because I never know if   they will bloom again once the blossoms fall.

IMG_1197

Today continues to be a bit rainy and cold outside – but definitely better that the hail that we had this weekend! Because today seems like a good day for something warm and cozy to eat, I am decided to make chili.

In regards to the meat substitute for this dish, I tend to always use Morningstar Farms Grillers (Original). Because my family grew up vegetarian, I have been eating these for as long as I can remember. These particular veggie burgers are my favorite because they are “meaty” but don’t taste like meat (unlike Boca burgers which are a little too meat-like for me).

IMG_1192-1


If you don’t want to use a meat substitute, you can definitely throw in an additional can of beans or use tofu instead. If you make this recipe, please share pictures in the comments.

Thank you all for stopping by – have a peaceful rest of the week.

Vegetarian Chili

FullSizeRender-1

Ingredients: 

One package Morningstar Farms Griller’s original burgers (thawed at room temp or warmed through in the microwave)

One can of black beans, rinsed and drained

1 cup frozen corn

1 cup chopped tomatoes (I used halved cherry tomatoes)

2 Teaspoons taco seasoning

2 Tablespoons olive oil

1 teaspoon salt

1-2 cups water or vegetable broth

Pinch of turmeric for color

Instructions: 

  1. Saute tomatoes in olive oil until softened – about 2-3 minutes
  2. Add in the burgers and mash using potato masher until broken up.
  3. Add in the corn, beans, taco seasoning and stir.
  4. Put in the water or broth and reduce heat to low. Add in salt and turmeric. Simmer over low heat for 30 min, stirring occasionally.
  5. Ladle into bowls and serve hot with tortilla chips for dipping and condiments (cilantro, sour cream, shredded cheddar cheese, chopped onions, jalapeños, etc.)

Notes: 

I do sometimes add in a spoonful of tomato past to add more of a bright red color to the chili – if you are using it, add it at the same time as when you are cooking the tomatoes.

Enjoy!

Love,

Pooja


Mexican Quinoa

image2-1Dear Readers,

I hope that you are having a lovely Thursday. The last few days have been busy ones and I find that sometimes, especially when I am tired or hungry, I have a hard time being positive. When that happens, I usually call my sister, or eat some dark chocolate, or pause and take a breath and think of something that I am grateful for. I came across this article yesterday that has some great tips on how to let go of negative thoughts: http://camillestyles.com/wellness/life-lessons/how-to-let-things-go/?slide=12

Please share what you do when you are feeling this way – having a toolbox of strategies always helps!

This meal was an invention when I was trying to clean out the fridge and make a well-balanced meal. Everyone liked it so much that it become a staple in our house – we often have it once every couple of weeks for dinner. It also makes great leftovers. Because of the base ingredients, it is also high in protein and gluten free. You can easily leave out the cottage cheese to make it dairy free as well.

Mexican Quinoa

Ingredients:

1 cup quinoa, soaked for ten minutes and rinsed 2-3 times

1 cube vegetable bouillon or 1 cup vegetable broth

Finely chopped vegetables (I usually use red pepper, zucchini, and frozen corn)

1 cup cottage cheese – full fat preferred

Taco seasoning (optional, can also use cumin alone)

1 can of black beans

1-2 Tablespoons olive oil

Toppings: chopped cilantro, chopped green onions, sour cream, chopped avocado

Instructions:

  1. Cook the quinoa with one cup broth (or boullion and 1 cup water)and an additional 1/4 cup water. Heat until the water is boiling, then turn down to minimum and cook, covered, until the liquid has absorbed (about 10 minutes). I find that the 1:1 and 1/4 ratio makes for quinoa that is a bit al dente so it holds up well when mixing with other things.
  2. Heat oil in a cast iron pan, once hot, saute the veggies until softened – about 7-10 minutes. Season with salt and cumin or taco seasoning (if using).
  3. Mix the black beans (drained) into the veggie mixture and cook until warmed through – another 5 minutes.
  4. Add in the cottage cheese and stir until incorporated.
  5. Now mix the quinoa into the veggie mixture until well mixed.
  6. Serve warm or at room temperature with desired toppings. Our family usually does sour cream and cilantro.
  7. Enjoy!

image1-2